
If you are confused about how to roast coffee beans at home, the good news is that it is easier than you might think. With a few simple tools and a little patience, you can turn raw green coffee beans into fresh, flavorful coffee right in your kitchen.
Home roasting gives you more control over taste, aroma, and roast level, so you can create coffee that perfectly matches your personal preferences.
In this guide, you will learn everything you need to know about how to roast coffee beans at home. From choosing green coffee beans to understanding roast levels, this article will help beginners roast coffee with confidence and enjoy fresher coffee every day.
Types of Coffee Roast Levels
Coffee roast levels are generally divided into three main categories: light roast, medium roast, and dark roast. Each type has its own unique flavor profile and brewing style.
Light Roast
Light roast coffee beans are roasted for the shortest amount of time. They are light brown in color and usually do not have an oily surface. During this stage, the coffee bean’s original flavor remains strong, so you can taste more of its natural notes.
Light roasts are often described as:
- Bright
- Fruity
- Floral
- Slightly acidic
Because they keep more of the bean’s original character, light roasts are popular among specialty coffee lovers. They work especially well with pour-over and drip coffee methods.
Medium Roast
Medium roast coffee is one of the most popular roast levels because it offers a balanced flavor. The beans turn medium brown, and the acidity becomes smoother than in light roast coffee.
Medium roasts often taste:
- Sweet
- Smooth
- Balanced
- Slightly nutty or chocolatey
This roast level provides a good mix of flavor, aroma, and body. It is also very versatile and works well for many brewing methods, including French press, drip coffee, and espresso.
Dark Roast
Dark roast coffee beans are roasted longer and reach a dark brown color with an oily surface. The roasting process creates bold flavors while reducing the bean’s original fruity notes.
Dark roasts are commonly described as:
- Rich
- Smoky
- Bold
- Low in acidity
These roasts are often used for espresso because they produce a strong and intense flavor. However, if roasted too long, the beans can taste burnt or bitter.
Coffee Roast Level Comparison Table
| Roast Level | Bean Color | Flavor Profile | Acidity | Best Brewing Methods |
|---|---|---|---|---|
| Light Roast | Light Brown | Fruity, bright, floral | High | Pour-over, drip coffee |
| Medium Roast | Medium Brown | Balanced, sweet, smooth | Medium | Drip, French press, espresso |
| Dark Roast | Dark Brown | Bold, smoky, rich | Low | Espresso, cold brew |
Which Roast Level Is Best?
There is no single “best” roast level because coffee taste is personal. If you enjoy bright and complex flavors, you may prefer light roast coffee. If you like smooth and balanced coffee, a medium roast is a great choice. On the other hand, a dark roast works well for people who enjoy strong, bold coffee flavors.
The good thing about learning how to roast coffee beans at home is that you can experiment with different roast levels until you find your perfect cup.
Tools and Equipment You’ll Need
Below are the basic tools and equipment you will need for successful home coffee roasting.
Green Coffee Beans
Green coffee beans are raw, unroasted coffee beans. These beans are the most important part of the roasting process because their quality directly affects flavor and aroma.
When buying green coffee beans:
- Choose fresh beans from trusted sellers
- Start with small batches
- Try beans from different countries to compare flavors
For example, Ethiopian beans often taste fruity and floral, while Brazilian beans usually have nutty and chocolate notes.
Heat Source
Coffee beans need steady heat to roast properly. The type of heat source you use depends on your roasting method.
Common heat sources include:
- Stove top burner
- Oven
- Air popcorn popper
- Electric coffee roaster
A consistent heat source helps roast the beans evenly and prevents burning.
Roasting Tool or Container
You will need something to hold and roast the coffee beans safely. Different roasting methods require different tools.
Popular options include:
- Heavy frying pan or skillet
- Baking tray for oven roasting
- Air popcorn popper
- Dedicated home coffee roasting machine
For beginners, a simple pan is often the easiest and cheapest option.
Stirring Tool
Coffee beans must move constantly during roasting to avoid uneven heating. A wooden spoon, a metal spatula, or a heat-resistant stirrer works well for this task.
Frequent stirring helps:
- Prevent burnt spots
- Create an even roast
- Improve flavor consistency
Cooling Tray or Metal Colander
Once the beans reach your desired roast level, they need to cool quickly. Fast cooling stops the roasting process and prevents over-roasting.
Many home roasters use:
- A metal colander
- Baking tray
- Cooling rack
Some people also use two colanders and toss the beans back and forth to remove chaff and cool them faster.
Storage Container
Freshly roasted coffee beans should be stored properly to keep their flavor. Use an airtight container and place it in a cool, dry area away from sunlight.
Good storage options include:
- Glass jars with airtight lids
- Coffee storage canisters
- Vacuum-sealed containers
Avoid storing coffee in the refrigerator because moisture can affect the taste.
Optional Equipment for Better Results
Although not necessary, some extra tools can make home coffee roasting easier and more accurate.
Thermometer
A thermometer helps track roasting temperatures and gives you more control over roast levels.
Timer
Using a timer helps you roast consistently and repeat successful batches.
Kitchen Scale
A scale allows you to measure coffee beans accurately before roasting.
Ventilation Fan
Roasting coffee creates smoke, especially during darker roasts. Good ventilation helps keep your kitchen comfortable and safe.
Quick Equipment Checklist
| Equipment | Purpose | Required for Beginners? |
|---|---|---|
| Green Coffee Beans | Main ingredient | Yes |
| Frying Pan or Roaster | Roasting beans | Yes |
| Heat Source | Provides roasting heat | Yes |
| Stirring Tool | Keeps beans moving | Yes |
| Cooling Tray or Colander | Stops roasting quickly | Yes |
| Airtight Container | Stores roasted beans | Yes |
| Thermometer | Tracks temperature | Optional |
| Kitchen Scale | Measures beans accurately | Optional |
Best Methods for Roasting Coffee Beans at Home
There are several ways to learn how to roast coffee beans at home, and each method offers a different experience. Some methods are simple and budget-friendly, while others provide better control and consistency. The best choice depends on your budget, available equipment, and how serious you are about home coffee roasting.
Below are the most popular methods beginners and coffee enthusiasts use to roast coffee beans at home.
1. Roasting Coffee in a Pan
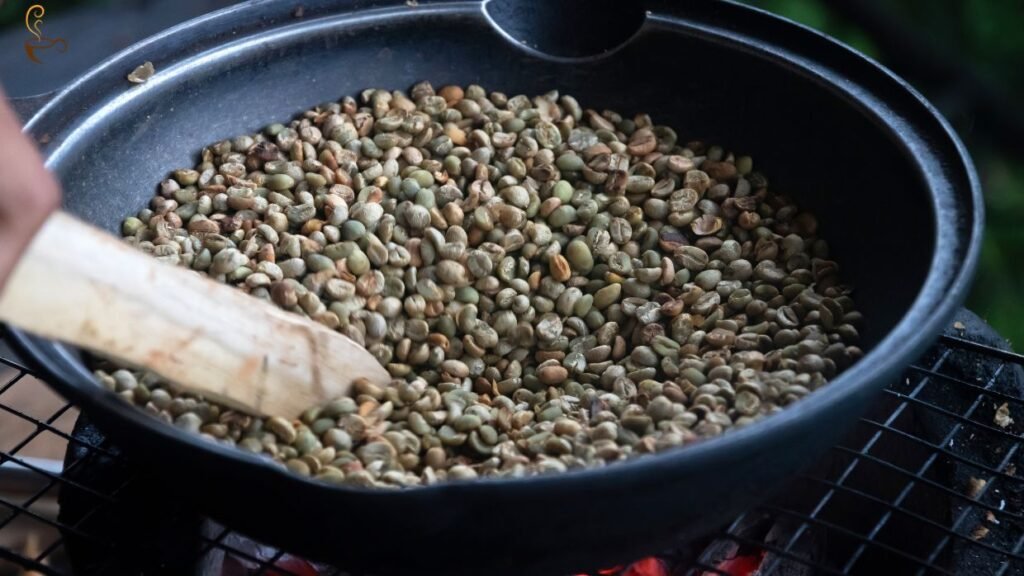
Pan roasting is one of the easiest and most affordable methods for beginners. Most people already have a frying pan or skillet at home, so there is no need to buy expensive equipment.
How It Works
Green coffee beans are heated in a pan over medium heat, stirred constantly. As the beans roast, they change color and begin to crack.
Steps for Pan Roasting
- Heat a heavy pan on medium heat.
- Add a small layer of green coffee beans.
- Stir the beans continuously.
- Listen for the first crack.
- Continue roasting until you reach your preferred roast level.
- Remove the beans and cool them quickly.
Pros
- Very affordable
- Easy for beginners
- No special equipment needed
Cons
- Harder to achieve an even roast
- Produces smoke and strong smells
- Requires constant attention
Best Tip
Use a thick cast-iron pan if possible because it distributes heat more evenly.
2. Oven Roasting Method
Oven roasting is another beginner-friendly option. It allows you to roast larger batches compared to pan roasting.
How It Works
The coffee beans are spread evenly on a baking tray and roasted inside a preheated oven.
Steps for Oven Roasting
- Preheat the oven to around 450°F (230°C).
- Spread green coffee beans in a single layer on a baking tray.
- Place the tray in the oven.
- Stir the beans every few minutes for even roasting.
- Watch the color carefully and listen for cracking sounds.
- Remove and cool the beans immediately.
Pros
- Good for larger batches
- Simple setup
- Easy for most households
Cons
- Less control over roasting
- Uneven roasting can happen
- Smoke can build up quickly
Best Tip
Open windows or use a kitchen fan because oven roasting creates noticeable smoke.
3. Using an Air Popcorn Popper
Many coffee lovers believe air popcorn poppers are one of the best tools for beginners learning how to roast coffee beans at home. The hot air circulates around the beans, helping them roast more evenly.
How It Works
The popcorn popper blows hot air through the coffee beans, moving them around during roasting.
Steps for Popcorn Popper Roasting
- Add green coffee beans to the popper.
- Turn the machine on.
- Allow the beans to move and roast evenly.
- Listen for the first and second crack.
- Stop roasting when the desired color appears.
- Cool the beans quickly.
Pros
- Even roasting
- Faster roasting time
- Affordable compared to coffee roasters
Cons
- Small roasting batches
- Some poppers may overheat
- Not all popcorn machines are suitable
Best Tip
Use a popcorn popper with side air vents instead of bottom vents for better roasting performance.
4. Using a Home Coffee Roaster
A dedicated coffee roasting machine is the most advanced and reliable method. Although it costs more, it offers better control, consistency, and convenience.
How It Works
Home coffee roasters are designed specifically for roasting coffee beans. Many models automatically control heat and airflow.
Steps for Using a Coffee Roaster
- Add green coffee beans to the machine.
- Select your roast settings.
- Start the roasting cycle.
- Monitor the roast progress.
- Cool the beans using the machine’s cooling feature.
Pros
- Consistent results
- Better temperature control
- Easier to repeat successful roasts
- Less mess and smoke
Cons
- More expensive
- Takes up extra space
- Learning curve for advanced settings
Best Tip
Start with small batches while learning your machine’s roasting behavior.
Comparison of Home Coffee Roasting Methods
| Roasting Method | Difficulty Level | Cost | Roast Consistency | Best For |
|---|---|---|---|---|
| Pan Roasting | Easy | Low | Medium | Beginners |
| Oven Roasting | Easy | Low | Medium | Large batches |
| Air Popcorn Popper | Easy | Low to Medium | Good | Beginner home roasters |
| Home Coffee Roaster | Medium | High | Excellent | Serious coffee enthusiasts |
Step-by-Step Guide to Roasting Coffee Beans at Home
Follow these simple steps to roast fresh coffee beans at home with confidence.
Step 1: Prepare Your Workspace
Before you start roasting, make sure your roasting area is safe and well-ventilated. Coffee roasting produces smoke and small pieces of chaff, the thin skin that comes off the beans during roasting.
Here are a few important preparation tips:
- Open windows or turn on a kitchen fan
- Keep oven mitts nearby
- Place cooling trays or colanders within reach
- Keep children and pets away from hot equipment
A clean and organized workspace makes the roasting process smoother and safer.
Step 2: Preheat Your Equipment
Whether you are using a pan, oven, popcorn popper, or coffee roaster, preheating is important for even roasting. Consistent heat helps the beans roast properly from the inside out.
General temperature guidelines:
- Pan roasting: Medium heat
- Oven roasting: Around 450°F (230°C)
- Popcorn popper: Automatically heats once turned on
- Coffee roaster: Follow the manufacturer’s instructions
Avoid using extremely high heat because it can burn the outside of the beans while leaving the inside underdeveloped.
Step 3: Add the Green Coffee Beans
Once the equipment is hot, add your green coffee beans. Do not overload the roasting container because the beans need room to move and roast evenly.
A good beginner batch size is:
- ½ cup to 1 cup of green coffee beans
As the beans roast, they will expand in size and lose some moisture.
For even roasting:
- Spread beans in a single layer if using an oven
- Stir continuously if using a pan
- Allow beans to circulate freely in a popcorn popper
Step 4: Monitor Color and Aroma Changes
As the beans heat up, you will notice several changes in color, smell, and texture. Watching these changes carefully helps you control the final flavor of your coffee.
Typical roasting stages include:
| Roasting Stage | Bean Appearance | Aroma |
|---|---|---|
| Early Stage | Green to yellow | Grassy |
| Mid Stage | Light brown | Toasty |
| First Crack | Medium brown | Sweet and nutty |
| Second Crack | Dark brown | Smoky and bold |
During roasting, the smell changes from grassy to bread-like and finally to rich coffee aromas. This is one of the most enjoyable parts of roasting coffee at home.
Step 5: Listen for the Cracks
One of the most important parts of learning how to roast coffee beans at home is understanding the cracking sounds.
First Crack
The first crack sounds similar to popcorn popping. This stage usually marks the beginning of light roast coffee. The beans expand and release moisture during this phase.
Light roast coffee is often stopped shortly after the first crack.
Second Crack
The second crack is softer and faster. This stage creates medium-dark and dark roast coffee flavors.
If roasting continues too long after the second crack, the beans may become burnt and bitter.
Listening closely helps you control your roast level more accurately.
Step 6: Cool the Beans Quickly
Once the beans reach your desired roast level, remove them from the heat immediately. The beans continue roasting from internal heat even after cooking stops, so fast cooling is very important.
You can cool the beans by:
- Pouring them into a metal colander
- Stirring them with a spoon
- Tossing them gently between two colanders
- Using a cooling tray or fan
Quick cooling helps preserve the flavor and prevents over-roasting.
Step 7: Let the Beans Rest
Freshly roasted coffee beans release carbon dioxide after roasting. This process is called degassing. Although it may be tempting to brew coffee right away, allowing the beans to rest improves flavor.
Recommended resting times:
- Light roast: 24–48 hours
- Medium roast: 1–3 days
- Dark roast: About 24 hours
Store the beans in an airtight container while they rest. Avoid sealing them completely airtight during the first few hours because gas still needs to escape.
Final Thoughts
One of the biggest advantages of home roasting is freshness. Freshly roasted beans often produce richer aromas, deeper flavors, and a smoother taste compared to pre-packaged coffee sitting on store shelves for weeks or months. In addition, roasting coffee yourself allows you to experiment with different beans and roast styles until you discover your perfect flavor profile.
Now that you understand how to roast coffee beans at home, you are ready to start experimenting and creating coffee that matches your own taste preferences. With a little patience and practice, you can enjoy fresher, more flavorful coffee whenever you want.
Frequently Asked Questions
Can I roast coffee beans without special equipment?
Yes, you can easily roast coffee beans at home without expensive equipment. Many beginners use a frying pan, an oven, or an air popcorn popper to get started. While professional coffee roasters offer better control and consistency, basic kitchen tools can still produce great results when used carefully.
How long does it take to roast coffee beans at home?
Most home coffee roasting methods take about 8 to 15 minutes, depending on the equipment, batch size, and desired roast level. Light roasts usually take less time, while dark roasts require longer roasting periods.
What is the easiest method for beginners?
Using an air popcorn popper is often considered the easiest method for beginners learning how to roast coffee beans at home. It provides more even roasting than a pan and usually requires less manual effort. However, pan roasting is also a simple and affordable option for first-time home roasters.
Is roasting coffee at home cheaper?
Yes, roasting coffee at home can save money over time. Green coffee beans usually cost less than pre-roasted specialty coffee. Although there may be some upfront equipment costs, many regular coffee drinkers find home roasting more affordable in the long run.
Does roasting coffee produce smoke?
Yes, roasting coffee naturally creates smoke, especially during darker roasts. Proper ventilation is important when roasting indoors. Opening windows, using kitchen exhaust fans, or roasting outside can help reduce smoke buildup.

MD Azizul Hakim is a content creator and the co-founder of Queek Coffee. He has been writing content and reviews for many years and loves to brew coffee and serve it to his colleagues.